Page scroll to id for WordPress tutorial
Basic tutorial for using “Page scroll to id” WordPress plugin on your WordPress site.
- Creating id targets
- Creating links
- Links highlighting
- Offset scrolling for sticky menus
- Scrolling from/to different pages
- Video tutorial
In order to use the plugin on your WordPress site (after installing and activating it), you need to do the following:
- Create id targets the page will scroll to or find existing id attributes in your theme to use with your links.
- Create links that point to those targets or enable the plugin on links that already exist in your site.


Creating id targets
Creating id targets in post block editor (Gutenberg)
You can create your targets in more than one ways in the block editor, e.g. using the group block, the “Page scroll to id target” block, the shortcode block, block class attribute, HTML anchor field etc.
Create id targets using the group block
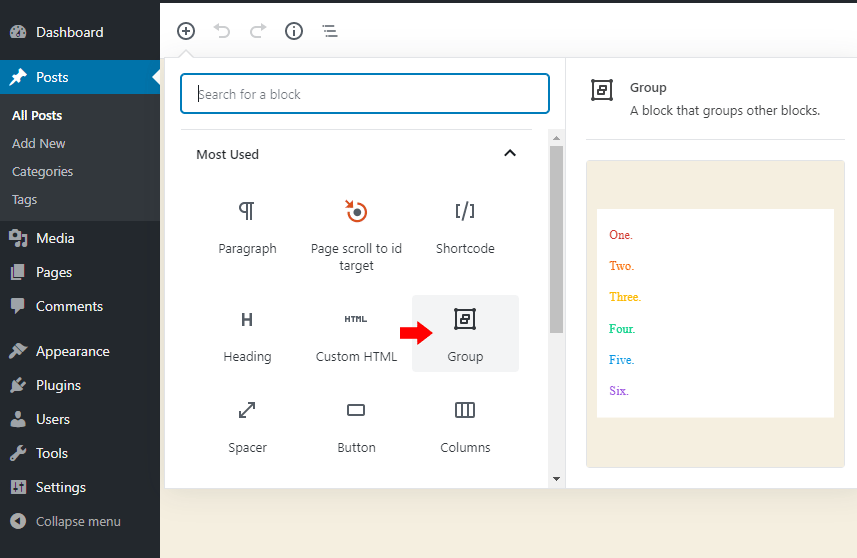 Click on the “Add block” icon and select “Group”. This will insert a general container block that can group other blocks and we can add the
 id on this group/general container block.
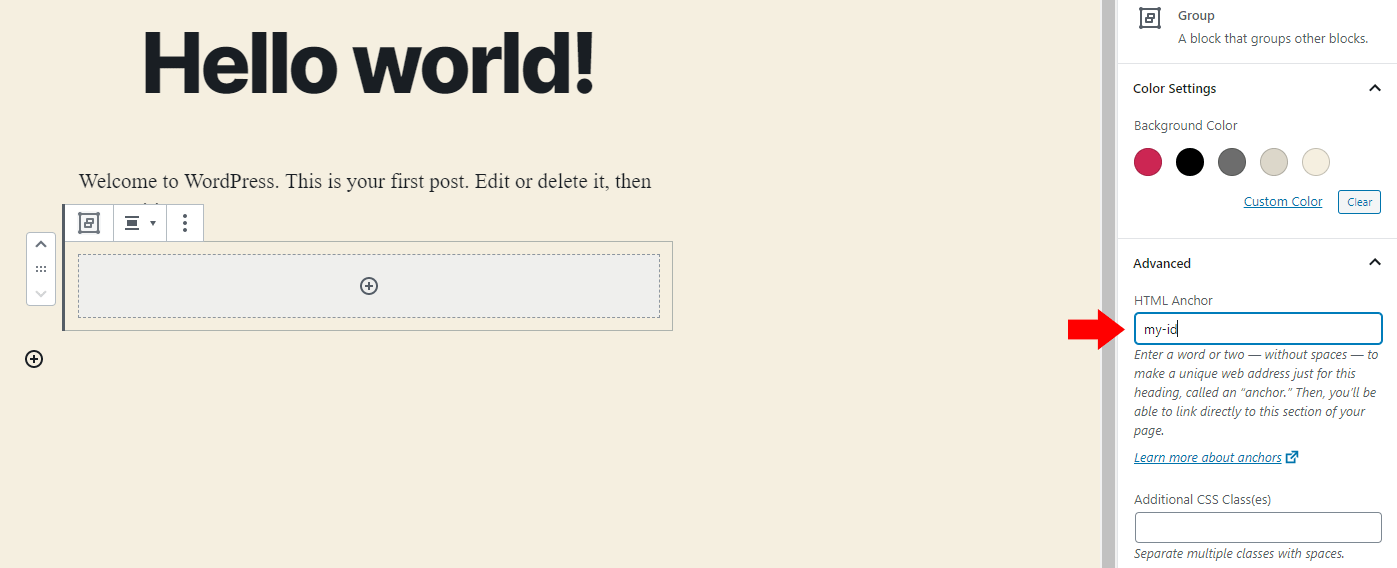 On the group block properties (right panel) you can add the id you want in the “HTML Anchor” field.
Create id targets using the “HTML Anchor” field
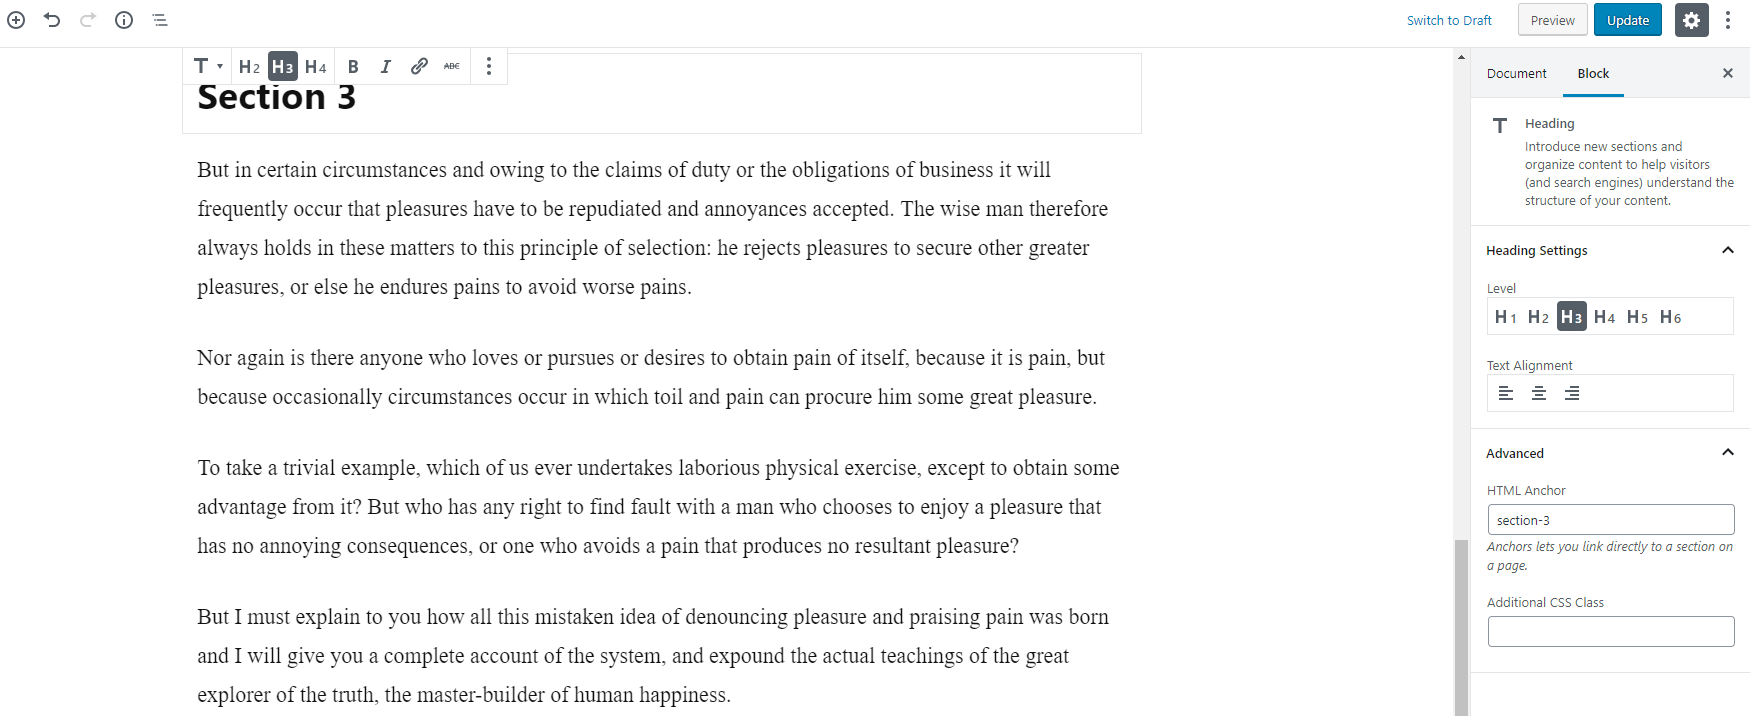
If you use headings in your content, you can use the “HTML Anchor” attribute of blocks to set a target id. Select your block, click “Advanced” in the right panel and insert the target id you want in the “HTML Anchor” field.
Create id targets using plugin’s “Page scroll to id target” block
The plugin has its own custom block for inserting targets: “Page scroll to id target”

Create id targets using “Additional CSS Class(es)” field
You can generate id targets for any block element, by setting its class name to: ps2id-id-yourid, changing the yourid part to the id value you want.
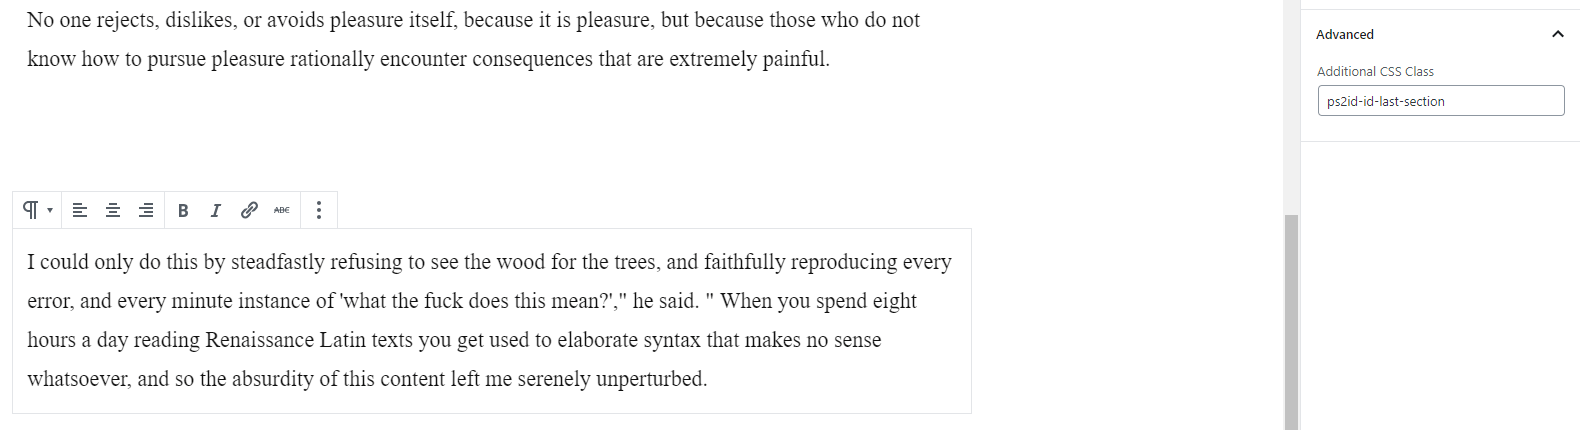 Click on a block element (e.g. a paragraph), click “Advanced” in the right panel and set the target id you want in the “Additional CSS Class” in the form of:
ps2id-id- plus the id you want.
For example, if you want to create the target id “last-section”, give the element the CSS class:
ps2id-id-last-section.
Create id targets using the shortcode block
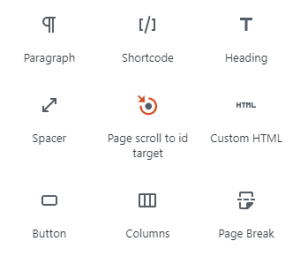
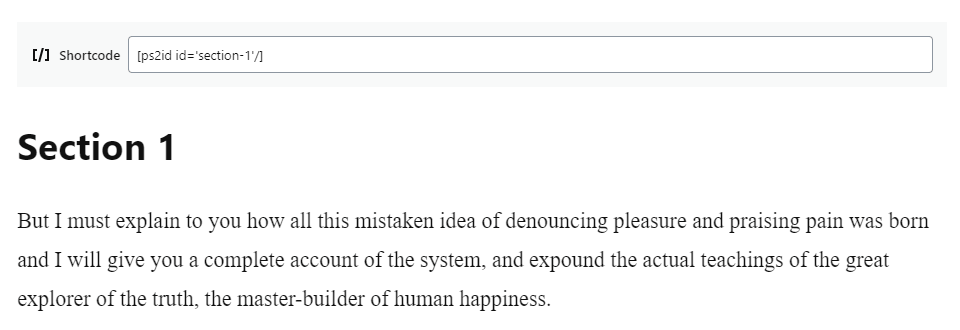 You can use plugin’s shortcodes in the block editor. Click on the “Add block” icon and select “Shortcode”.
Add the [ps2id id='section-1'/] in the shortcode field to create a target with id section-1.
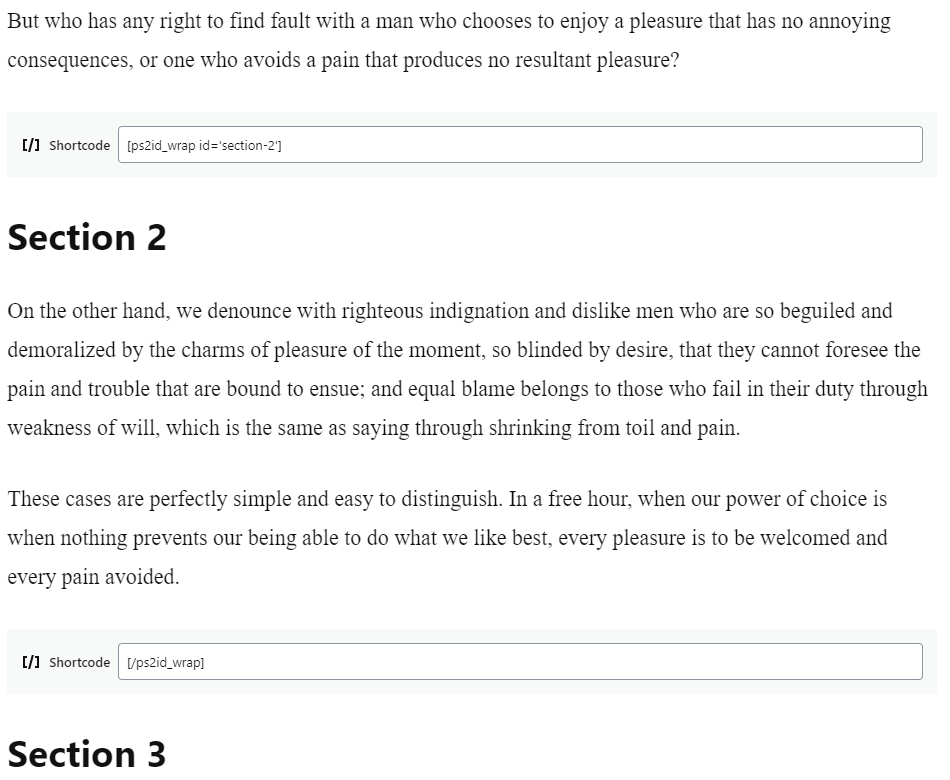 You can also use the
 [ps2id_wrap] shortcode accordingly.
Creating id targets in post visual editor (classic “old” editor)
 In post visual editor, click the toolbar button “Insert Page scroll to id target” to create a target at the cursor position in the editor.
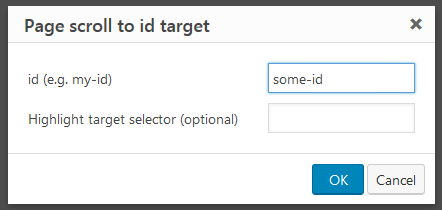 In “Page scroll to id target” modal insert the id value you want (e.g.
 some-id) and click “OK”. The target shortcode (e.g. [ps2id id='some-id' target=''/]) will appear in the editor. Update/save the post/page. You can now use this id value in your link(s) URL (e.g. #some-id).
Creating id targets in post editor via shortcodes
In post visual or text editor, enter [ps2id id='some-id'/] in the place you want to create the target and set the id attribute to the value you want. This will create a simple anchor-point target. If you want to wrap your content (or part of your content) in a target id (same as adding an id attribute to some content), use the [ps2id_wrap] shortcode:
[ps2id_wrap id='some-id']
your content...
[/ps2id_wrap]
Update/save the post/page so you can use this target value in your link(s) URL (e.g. #some-id).
Click here for more info on target shortcodes
Creating id targets in HTML
Wrap your content in a div with an id attribute (recommended for better link highlighting) or add simple anchor points (with id attributes) before each content section. Examples:
<div id="section-1">
  <p>Section 1 content...</p>
</div>

<div id="section-2">
  <p>Section 2 content...</p>
</div>

<div id="section-3">
  <p>Section 3 content...</p>
</div>
<a id="section-1"></a>
<p>Section 1 content...</p>

<a id="section-2"></a>
<p>Section 2 content...</p>

<a id="section-3"></a>
<p>Section 3 content...</p>
Creating id targets in WordPress widget areas
Create targets in your widget areas (Appearance → Widgets) via plugin’s “Page scroll to id target” widget.
Keep in mind that all WordPress widgets have existing id values that you can use with your links. You can find these id values within each active widget under “Page scroll to id target” label. The option to display these values is “Display widgets id attribute” which is enabled by default.
FAQ
Creating links
Creating links in WordPress Menus
 The plugin is enabled by default on WordPress Menu links (Appearance → Menus), so you can start adding custom links and set their URL to the id/target you want to scroll to.
Edit your menu and add “Custom links” as these type of links allow us to enter a custom URL with the id we want. Your links URL should be in the form of #some-id, http://my-site.com/page/#some-id, /page/#some-id etc.
Please note that if you want your links to work from other/different pages, you’ll need to insert the full address with the target id in their URL (e.g. http://my-site.com/page/#some-id) or the relative-root URL (e.g. /page/#some-id).
 In Appearance → Menus, click “Screen Options” at the top and make sure “CSS Classes” is checked. Edit each link you’ve created and insert the
 ps2id value in “CSS Classes” field.
In addition to using the class field, the same can be done using the “Link Relationship” field (i.e. rel attribute). Click “Screen Options” at the top and make sure “Link Relationship (XFN)” is checked. Edit each link and insert the m_PageScroll2id value in “Link Relationship (XFN)” field.
Any menu item/link with ps2id class or m_PageScroll2id rel attribute will be handled by the plugin.
Creating links in post block editor (Gutenberg)
You can use plugin’s shortcodes in the block editor. Add the shortcode: [ps2id url='#some-id']link text[/ps2id] inside any block element to create a link that points to the “some-id” target.
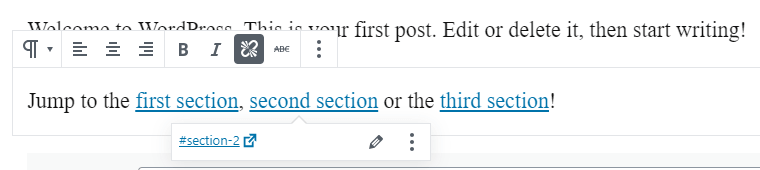 Keep in mind that since “Page scroll to id” version 1.6.3, the plugin is enabled by default on all links with a non-empty hash value (e.g.
 #some-id) in their URL. This means that you don’t have to use plugin’s shortcode to create links, as any link you create via the WordPress editor will work.
Creating links in post visual editor (classic editor)
 In post visual editor, click the toolbar button “Insert/edit Page scroll to id link” to create a link at the cursor position in the editor or from text you’ve already selected.
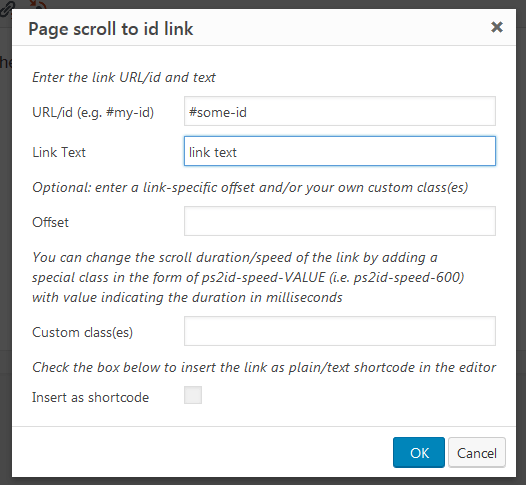 In “Page scroll to id link” modal insert the link’s URL and text. The URL should be in the form of
 #some-id, http://my-site.com/page/#some-id, /page/#some-id etc. When ready, click “OK” and the link will appear in the editor. You can edit the link via both “Insert/edit link” and “Insert/edit Page scroll to id link” buttons, as well as inline.
“Page scroll to id link” modal provides additional options like “Offset” and “Custom class(es)” that can be used to change link’s offset, its scroll duration/speed etc.
Creating links in post editor via shortcodes
In post visual or text editor, enter [ps2id url='#some-id']link text[/ps2id] in the place you want to create the link and set the url attribute and link’s text to the values you want. The shortcode provides the same options as plugin’s “Insert/edit Page scroll to id link” toolbar button via attributes.
Creating links manually
Any link with ps2id class or m_PageScroll2id rel attribute value will be handled by the plugin. For example:
<a href="#some-id" class="ps2id">link text</a>
<a href="#another-id" rel="m_PageScroll2id">link text</a>
Enabling the plugin on links that already exist in your site
You can instruct “Page scroll to id” to handle any link in your page(s) by using the “Selector(s)” field in plugin settings.
If you need to enable “Page scroll to id” on all links with URL containing a hash (#), insert the following value in “Selector(s)” field:
a[href*=#]:not([href=#])
Click here for more info on “Selector(s)”
FAQ
- How do I make my links work from any page in my site?
- Can I have links with different offsets?
- How to make the plugin work with WordPress Menu links?
- Can I have links with different scroll duration/speed?
Links highlighting
Each time a target element is visible on the screen (i.e. is within the viewport), the plugin adds the mPS2id-highlight class to its associated link or links (i.e. the links that scroll to this target). You can use this class in your theme’s stylesheet or custom CSS to style the current/active link(s), e.g.
a.mPS2id-highlight{ background: #ff0; }
Common case scenario and example
Lets say you have a sticky menu containing links that scroll to various targets/sections within the page. Your links text color is black (which may be set by your theme or some other stylesheet):
.memu-item a{
    color: black;
}
When scrolling through page sections (i.e. targets) you want the link of the visible/current target to become red. You can do this by adding the following CSS:
.memu-item a.mPS2id-highlight{
    color: red;
}
Notes and more info
The default highlight classes for the links are: mPS2id-highlight, mPS2id-highlight-first and mPS2id-highlight-last (you can change these class-names in plugin’s settings if you want).
For more information about the highlight classes and options see “Classes & highlight options”, “Highlight selector(s)” and FAQ below.
FAQ
- How do I make my links stay highlighted for longer distance while scrolling?
- Multiple links get highlighted! How to highlight only one?
Offset scrolling for sticky menus
If your page has a top sticky/fixed-positioned menu, you’ll probably need to use plugin’s “Offset” option in order to prevent the menu from overlapping your content. This option allows us to shift (i.e. offset) scrolling, so in the case of a top sticky menu, we usually need to “stop” scrolling a few pixels before the target reaches the top of the page (to accommodate for the space the sticky menu occupies).
Go to Settings → Page scroll to id → Offset and insert an offset amount equal to your sticky menu height (in pixels). You can insert its height value as a number (e.g. 100) or you can insert your menu selector (e.g. #my-sticky-menu), so the plugin calculates its height automatically.
The plugin provides special selector expressions in order to define advanced offsets and work with responsive menus. For more info see “Offset” option.
Scrolling from/to different pages
The plugin has the option to scroll from/to different pages enabled by default. This means that when you click a link which points to a target id on another page, you’ll still get the smooth scrolling effect which will happen immediately after that page is fully loaded.
The only thing you’ll need is to make sure your links have the full address with the target id in their URL (e.g. http://my-site.com/page/#some-id).
I see you have instructions for various page builders, but not mine, Beaver Builder. I wonder if you can make one, or give me a hint on how to use your plug-in with Beaver Builder?
Normally, you should enable “Prevent other scripts from handling plugin’s links” option in plugin settings and create your targets using the builder’s row/element settings, e.g. on a row element:
Row Settings > Advanced > ID
Hello,
I am not being able to highlight the menu items on this website: http://choupal.co.in/
I am using elementor pro, ocean wp theme, my sticky menu for sticky header.
I have tried adding additional CSS :
.menu-item a.mPS2id-highlight{
color: #faa522;
}
&
. main-navigation .menu-item a.mPS2id-highlight{
color: #faa522;
}
Hi,
Your theme uses a more specific css selector. Try the following:
#site-navigation-wrap .dropdown-menu > li > a.mPS2id-highlight{ color: #faa522; }Thanks Man, it works.
Hi, the plugin works very well on my website with WordPress Twenty Seventeen template. But I have a small problem : when I display the submenu (of the entry “Ateliers”) and clic for a panel in my main page, it scrolls til the good place and… the submenu keeps displaying (wich is boring because it hides a piece of the page (title etc.) except if I clic somewhere in the page. When I desactivate Page scroll to id, it’s better, the submenu hides by itself just after I clic on it… but I loose the pleasant scrolling effect. Is there something I can do so that the submenu doesn’t keep displaying when using this plugin ? Thanks
Hi,
Can you add an extra js script in your page? The following should work:
<script>
(function($){
  $(window).on("load",function(){
    $("body").on("click",".menu-item ._mPS2id-h",function(e){
      $(this).blur();
    });
  });
})(jQuery);
</script>
Let me know
It works!
Thank you!
Awesome 🙂
Hello,
Love the plugin, its awesome, but recently we are getting quite a few setTimout errors in chrome dev, is there something we can check or do to adjust this?
[Violation] 'setTimeout' handler took <N>ms page-scroll-to-id.min.js?ver=1.6.7:2 [Violation] 'setTimeout' handler took 63ms page-scroll-to-id.min.js?ver=1.6.7:2 [Violation] 'setTimeout' handler took 92ms page-scroll-to-id.min.js?ver=1.6.7:2 [Violation] 'setTimeout' handler took 58msHi,
I’ve responded to your post here:
https://wordpress.org/support/topic/settimout-errors/#post-12476477
I need to see your page in order to help (because this is not a known or common issue).
Hi There,
thanks for getting back to us, we cant post our website in a public space, is there anyway we can email you and pay for direct help?
cheers
Sure, contact me here:
http://manos.malihu.gr/contact
when i click about us it seems the scroll goes down a little further than i like
how can i possibly fix this any idea?
Hi,
It seems that your theme handles your links preventing “Page scroll to id” from doing its thing. Enable “Prevent other scripts from handling plugin’s links” option in plugin settings and let me know so I can check your page again.
Amazing plugin! Solves a major headache!
I have a minor issue and I’m not sure if it’s this plugin or smart slider 3 which cause the problem. When you scroll manually on the vertical slider, it tends to “skip slides” ie does not “snap” to the next slide.
As I am only using smooth scroll to ID for menu links, can I disable scroll functionality for other scrolling needs on my site to prevent conflicts?
Thanks in advance
Jean
Hello,
The missing slides and snapping comes from another plugin/script (I’m guessing smart slider 3).
There should be no conflict between “Page scroll to id” and your slider but if you want, you can tell “Page scroll to id” exactly which links to handle. For example, if you want to instruct it to handle only your top menu links, do this:
Go to “Page scroll to id” settings and set the “Selector(s)” option value to:
.brz-menu__item a[href*='#']:not([href='#'])and click save changes.
Thank you for the quick reply. It was indeed a little glitch with ss3 and they fixed it swiftly. thanks again. Jean
Hi – can this plugin work for a mouse scroll or tap down arrow?
thanks!
Hi,
For mousewheel and keyboard, you’ll need extra javascript that you’ll have to put in your page/template. See below the post below for details/guide:
http://manos.malihu.gr/page-scroll-to-id-with-mousewheel-and-keyboard/
Hope this helps
It’s a great plug in.
I have a Heading long deep in my page. I create a some thing like “Table of contents”,, at the top of the same page.
If I click on the link every thing is working as expected as per your video. Scrolled smoothly to target id.
Technically it looks like new page is stacked/pushed on to previous. because i can go back but i can not scroll there.
When I am scrolling towards to go back to table of contents, I can not find my table of contents. instead have to click back button.
Am I missing some thing.
Please correct me or help me.
Thanks
how do i use it in the main page, like if i type http://www.site.com/#id it works but how do i make my website load t
Hi. I have added the widget to my sidebar but nothing is displaying. https://imgur.com/I6tQpLY I made the ID section1 on both the post and the sidebar. What have I done wrong?
The “Page scroll to id target” widget is an empty element so there’s nothing to display. You can use it by placing it before other widgets, in order to target them in your link(s).
For example, creating a link with URL
#section1will scroll the page to the position of your “Page scroll to id target” widget.You can see how to use the widget on the video tutorial above in the 7 minute mark.
Not sure if this is what you need. Let me know.
Hi,
I used this app before, and this is a great app, but now I have a little problem. I downloaded it, activated it, but the icon does not appear on the editor platform. Do you have a solution?
Thank you, gergo
Hi,
Which editor do you use? Gutenberg block editor? A plugin page builder?
The 2 toolbar icons are for the classic visual editor (up to WordPress version 4.9). The Gutenberg block editor (WordPress version 5) has its own “Page scroll to id target” block (see Gutenberg guide above).
If you use a page builder plugin, you can find tutorials for the most common:
Using Page scroll to id with the Divi Builder plugin
Using Page scroll to id with SiteOrigin Page Builder
Using Page scroll to id with WPBakery Page Builder
Using Page scroll to id with Elementor Page Builder
Hi there, the plugin doesnt seem to be responding to our site. I have jumps from the About dropdowns but it’s not functioning like a scroll. I adjusted some settings you suggested in these comments but still no luck. Any advise?
Hi,
I checked your page and:
1)”Page scroll to id” is not installed/activated.
2)Your links URL do not have a trailing slash.
3)Some of your id targets (e.g. “Who We Are” ) do not have the correct value.
What you need to do:
1)Obviously, install/activate “Page scroll to id”. After activation, go to “Page scroll to id” settings and enable/check “Prevent other scripts from handling plugin’s links” option. Save changes.
2)Change your links URL to include the trailing slash because your web server redirects all requests lacking trailing slashes (e.g.
/some-pageredirects to/some-page/).For example, change the “Who We Are” link from:
/about#Who-We-Areto:
/about/#Who-We-AreAll your links should be like this because otherwise the page reloads/redirects.
3)Add the correct target id value where it’s needed. For example, “Testimonials” target id is correct while “Who We Are” is not.
Since you’re using WPBakery Page Builder, check this tutorial on how to easily add id targets:
http://manos.malihu.gr/using-page-scroll-to-id-with-wpbakery-page-builder/
Hope this helps
This is an amazing plugin! Thank you!
I’m having a small issue with the offset feature. I’m not sure why, but I can’t get the offset function to work on tablet or mobile.
It’s for my girlfriend’s sister’s wedding website – http://www.nigrowedding.com/.
Any help would be very much appreciated, thank you!
Alan
Hello,
It seems that your theme uses its own function for scrolling the page. Go to “Page scroll to id” settings and:
1. Disable “Auto-generate #ps2id-dummy-offset element” option (you don’t need it).
2. Insert
#main-headerin the “Offset” option.3. Enable “Prevent other scripts from handling plugin’s links” option.
Save changes, test and let me know
Works perfectly! Thank you so much!
Great! Thanks a lot for your donation 🙂
Hello, thanks for a nice plugin. However, I get 403 error “Forbidden” each time I try to save any settings on the plugin. I change privileges on y server to allow me read, write and execute files…I had to revert to version 1.5.6 to get rid of the error. What could be the issue with new version?
1.5.6 is a very old version, so I have no idea what might be the issue with your server. What server you’re using? Which version of WordPress? What version of php?
Did you uninstalled 1.5.6 and then installed the new version?
the elementor page builder doesn’t seem to work when I activate your plugin. I have elementor 2.5.14 and elementor pro 2.5.5. Everything loads, except none of the tools are selectable, and just has a loading animation. if i deactivate your plugin, everything works and then activating again makes the problem come back. Is there maybe another plugin that the script doesn’t play well with? It does work if i downgrade back to elementor 2.5.7.
nevermind, I had another plugin, mystickymenu that I deactivated and it works just fine now.
Page scroll is not happeming without id in the url.
I’ll need to see your page/site in order to help. Can you post your URL?
Dear Malihu,
I tried to use your plugin with my WP-site, where I already installed OceanWP and Elementor. Could it be that those 2 plugins do not allow to use yours?
When I follow your video tutorial on pagas (second 40…) I got a complete different layout in my WP editor.
Do you have any idea what I am doing wrong please?
Thank you for your help!
Regards
Michael
Hello Michael,
Elementor page builder does not allow third-party plugin buttons (like the insert link/target plugin buttons) on its editor. You can do it though without using plugin’s buttons. Check the “Using Page scroll to id with Elementor Page Builder” guide here:
http://manos.malihu.gr/page-scroll-to-id-elementor-guide/
Hope this helps
Hi i want to create site with horizontal page scroll, but i cant use your plugin i setting but didnt work.
http://joxi.ru/YmEWzplcwZMkxA
http://joxi.ru/E2pjEn7C7BGqpr
http://joxi.ru/12MOzxyHl4kYPr
http://joxi.ru/MAjyEenCjvkJb2
I want to create this site https://themezaa.com/html/resume/default/index.html?page=contact
can you help me
Hello,
The plugin cannot work with the layout of the page in the link you posted. This is because “Page scroll to id” works strictly on document’s root element (html/body), i.e. it scrolls the entire page. The page you posted has an inner scrollable div.
Hope this helps
Yes i get it. How can i create simple horizontal page scroll with Elementor? Can you explain? I can send you test login and pass can you setting. I used your setting but it didnt work. http://joxi.ru/GrqbjB8c4NVE3m
What i to do wrong?
I can’t help with that. You need to search for a tutorial or template for creating such layout. This has to do more with HTML/CSS than the page builder you’re using (like Elementor).
Can you explaine me steb by step setting horizontal scroll with elementor. I cant find info for Elementor.
Can i send you inbox login and pass or can you explaine?
Elementor won’t help you create a horizontal layout because it’s not within its scope or functionality. Elementor is a page builder that helps you create content.
You need a WordPress theme. You need to search and get a horizontal designed theme.
You either have to get a (free or premium) horizontal WordPress theme or hire a web developer to create one from scratch. Then you can use Elementor to create the content (Elementor as most page builders work with most themes regardless their layout).
Hi,
I installed your plugin but had to deactivate it for certain reasons. I then proceeded to uninstall the plugin.
It seems that your plugin has made changesto my website that remain after uninstalling your plugin and after attempting to restore previous revisions of the website. The issue I have now is that the default smooth scroll that the website has now is “jumpy”. To be more precise, clicking on a link from the top will make the website smooth scroll just a bit past its destination, and then scroll back up.
So for example if it used to smooth scroll from lines 1 to 9, now it smooth scrolls from lines 1 to 10 and then back up to 9.
This is really a big issue and if I can’t fix it I will have to redo the entire website! Please do help.
Regards,
Adam
Hello,
The plugin does not change theme files or templates in any way. In addition, when you uninstall “Page scroll to id”, it leaves zero traces in the database or the file system.
The issues you’re having are due to some other plugin or the theme itself.
If you could post your site’s URL, I’d be able to check your site and let you know what causes the problem(s).
Again, “Page scroll to id” does not change websites. When it’s activated, it simply connects existing links to target elements (both created by the user).
Please send me or post your URL so I can check it and see if I can help.
Thank you for such a quick reply!
I am very new to WordPress and know very little about website development, so please excuse me if I seem unknowing in this area.
The website was working just fine yesterday. Today, I made extremely minor editing, like changing the font type of some text in a content box or the font color of a word in another content box. The only actual change I made was using the “page scroll to id” plugin.
I noticed after installing and activating this plugin that if I go to Customize -> Menus -> Primary”, the number of available fields decreased. Before, the following were available:
URL; Navigation Label; [ Box ] Open link in a new tab; Title Attribute; CSS Classes; Link Relationship (XFN); Description).
After installing and activating the plugin, only the first two were made available. I don’t know where, but clearly the plugin makes *some* changes. These changes remained even after deactivating and uninstalling the plugin.
I reinstalled and reactivated the plugin. The above changes were not made this time.
I can’t really say what happened the first time. It’s impossible for the plugin to alter/modify Customize > Menus, so maybe something else happened.
So I guess everything is ok now? Let me know if you need any help.
I got an error:
Uncaught Error: Syntax error, unrecognized expression: a[href*=#]:not([href=#]),._ps2id,a[data-ps2id-api=’true’][href*=’#’],.ps2id > a[href*=’#’],a.ps2id[href*=’#’]
and I think it should use ” instead of ‘ but I cannot change it in the setting.
Pls help me…
You probably use non-WordPress version of jQuery library. Go to plugin settings and change the “Selector(s)” option value to:
a[href*='#']:not([href='#'])Save changes and test your page.
Hi,
by default in my theme, I have a horizontal spreadsheet with slides that works perfectly well. but when I activate “Page scroll to id”, the links take me to the bottom of my page.
my question is: can we customize the anchors so that these tools do not interfere with existing code?
thanks to help me.
regards,
Hi,
Yes, you can change the plugin “Selector(s)” option to include or exclude the links you want. If I could see your page I’d be able to tell you exactly which selectors to use.
As an example, you can change the “Selector(s)” option to:
.menu-item aso the plugin handles only menu links.
Thank you for this quick response. however, I am new to wordpress, and my knowledge is still weak in code. what would you need to see my page? .. do you want a FTP account or the URL of my page only ?
thank to your support.
regards,
Hi,
Now… I get it !… everything is good,
Thank you for your support and this tool !
Have a great day,
regards,
You’re welcome 🙂
I have activated the Scroll to ID Plug-IN on my WordPress 5.1 Altitude Pro 2.8.1 Genesis based Theme. I am using Elementor (2.4.7) Pro (2.4.5) as my Page Builder.
Caveat: I am not a Coder or experienced Web Designer/Developer.
In all the Documentation it references
“In post visual editor, click the toolbar button “Insert Page scroll to id target” to create a target at the cursor position in the editor. ”
I never see that tool, toolbar button, or tool bar for that matter even though in S2ID settings I have enabled it.
What am I missing? Please advise.
I have enabled Gutenberg, and disabled Classic Editor, Visual Editor, Elementor Editor….never do I see the Tool shown in the Video???
Found the Problem.
The Genesis Themes have a Plugin for “Classic Editor” and I had it disabled so all I got was the Block editor…and not the Classic WordPress editor.
Once Enabled I got the classic editor interface with the Tool/Toolbar everything!
Yes, plugin toolbar buttons work only with the classic editor. The new block editor (named “Gutenberg”) does not allow custom toolbar buttons.
This said, you can still use the plugin with the Gutenberg block editor via plugin’s shortcodes.
The next version of the plugin (1.6.5) will have a custom block for inserting targets. You can test it now if you want by downloading and using plugin’s development version:
https://downloads.wordpress.org/plugin/page-scroll-to-id.zip
Hi . . Thanks for the plugin. I want add some margin-top : 40px; on the target content. How to apply this.?
Because if i click one target link that time the target content 30px hide by my menu bar. so i want use maring-top on the target content. Help me.
Hi,
You can do this by using the plugin’s offset option. Go to plugin settings and set the “Offset” option to:
40Alternately, you can give your target element a top padding (not margin). For example:
#your-id{ padding-top: 40px; }Any chance for a guide for Elementor? I want to use this when clicking an icon (which jumps to an anchor link), not from the WordPress menu.
For Elementor, go to plugin settings and make sure the “Selector(s)” option value is:
a[href*=#]:not([href=#])and also that “Prevent other scripts from handling plugin’s links” option (under “Advanced options”) is enabled/checked.
If your icon is an actual link, the plugin should work. If you send me your link I’d be able to check it and help.
Hi ,
Actually im using Neve WordPress theme, were its a parallax website and im unable to add menu to scroll page, though i put #section id after link its not working. Kindly suggest me how exactly i can insert menu in that theme. thank you.
—
Christina
Hi,
I’m guessing you what to make your “Focus” link scroll the page, right?
If yes, you need to add a target with id
focusin your page. Currently there’s nofocustarget in the document.I love this plugin but have always abandoned it because I can’t seem to get the offset to work correctly.
My sticky menu changes height w different screen sizes and is set with a class selector, not an id.
I’ve tried using px in the offset settings, but that doesn’t work and using .site-header doesn’t seem to work either.
Any suggestions? I’m about to scrap it again!
Thanks so much,
Karen
Your theme seems to be using its own scrolling functions that prevent “Page scroll to id” from doing its thing. That’s why offset doesn’t work. Try this:
Go to plugin settings and enable “Prevent other scripts from handling plugin’s links” option. Save changes and test your page.
Let me know if it worked
Hi Malihu,
Thank you for this plugin and your support!
I am using beaver builder for the site. The menu links work for all the sections but I cannot get the menu to highlight when scrolling up and down.
Also if its possible to get the menu bold and highlight when scroll up or down that would be great. Of curse I’m doing something wrong..
Here is the site
https: // www. taifinancialconsulting. com
Appreciate your input.
Thank you
At
Hello,
You need to change the CSS selector you added from:
#menu-main .current-menu-item a.mPS2id-highlightto:
#menu-main a.mPS2id-highlightso all menu items get highlighted.
Hi is possible use your plugin with the mouse wheel?
Going up and down scrolling the wheel jumping from one section to another?
Thank u
E
Hi, check this post:
http://manos.malihu.gr/page-scroll-to-id-with-mousewheel-and-keyboard/
Thanks for the plugin, I followed your tutorial but can’t get it to work for some reason.
The page I’m working on is http://seroinstitute.com/accommodation/
Are you able to check & let me know if I’m doing something wrong?
Help me please!
The problem is that two menu items are highlighted at once. It is necessary to highlight only one of them while scrolling through the page
how to fix: http://prntscr.com/kmi40s
site: http://makaroni.design-time.com.ua/
I use: Elementor Pro, Astra, Page scroll to id
changed the theme to OceanWP
I´m already big fan of this awesome plugin! My only problem is hightlighting. The menu items don´t highlight or change any classes. By clicking them it is working. It´s just the thing with recognize the content in the viewport. Can you help me please?