This website uses cookies to personalise ads and to analyse traffic ok
web design

Simple jQuery fullscreen image gallery

Simple jQuery fullscreen image gallery

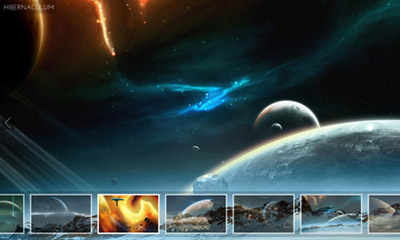
A fullscreen image gallery made with jQuery and CSS. The gallery features fullscreen images in various modes and custom thumbnail scrolling script.

The gallery was made by a combination of some previous scripts and tutorials posted on this blog. The images used on the demo are artwork of Tobias Roetsch.

Customization

The $defaultViewMode variable within the script, allows you to change the default images view mode. You can set the value to:

  • normal – images fit in window (all image data is visible)
  • full – images expand to window size (fullscreen)
  • original – images keep their original sizes (centered on the screen)

The rest of configuration options you can set within the script are:

  • $tsMargin – first and last thumbnail margin (for better cursor interaction)
  • $scrollEasing – scroll easing amount (0 for no easing)
  • $scrollEasingType – scroll easing type
  • $thumbnailsContainerOpacity – thumbnails area default opacity
  • $thumbnailsContainerMouseOutOpacity – thumbnails area opacity on mouse out
  • $thumbnailsOpacity – thumbnails default opacity
  • $nextPrevBtnsInitState – next/previous image buttons initial state (“hide” or “show”)
  • $keyboardNavigation – enable/disable keyboard navigation (“on” or “off”)

I’ve included the complete gallery code on page 2 of this post.

Changelog

  • Jan 23, 2011
    • Gallery features next/previous image functionality via buttons and keyboard arrows
      Thumbnails scrolling function has been optimized significantly

License

This work is released under the MIT License.
You are free to use, study, improve and modify it wherever and however you like.
https://opensource.org/licenses/MIT

Pages: 1 2


338 Comments

Post a comment

Comments pages: 1 4 5 6

  1. john
    Posted on July 10, 2018 at 10:38 Permalink

    Thanks for the code it was really helpful, But is there any way to make the transition to next image little more animated or smooth so that the black loading screen doesnt show up… It will look much smoother if the next image transition becoms little smooth and eye catchy. Could anyone plz help me out.. tried my brains out but couldnt figure it out..

    Thanks

    Reply
  2. Klaus
    Posted on January 28, 2017 at 04:50 Permalink

    Hello Malihu.
    I have an album with 300 images in it. It is undesirable to have that many images to scroll through on one page. Is it possible to have buttons somewhere on your fullscreen Image Gallery page, say top right, which link to pages within my album. Say, for example, five clickable pages with 60 images for each gallery of the album?
    I have read through the hundreds of comments and saw that you had planned to do something like this back in 2012. Did you manage that? I hope you have time to reply to this comment and possible have a solution for me.
    regards

    Reply
    • Klaus
      Posted on January 29, 2017 at 23:34 Permalink

      Tried to edit my comment, but couldn’t. I meant a drop down menu on the top toolbar, where I asked for ‘buttons’.

      Reply
  3. Pam
    Posted on December 12, 2016 at 12:12 Permalink

    I’ve used the big image as a link to another page. Is there any way to modify the code so that, when the visitor returns to the gallery, the queue of images doesn’t reset:

    $outer_container.data(“nextImage”,$(“.content”).first().next().find(“a”).attr(“href”));
    $outer_container.data(“prevImage”,$(“.content”).last().find(“a”).attr(“href”));

    The clicked-on image is the current image on returning, courtesy of a php session variable.

    Reply
  4. ValliP
    Posted on September 15, 2016 at 18:36 Permalink

    Hi,
    Thanks for sharing. This image gallery looks great and very helpful. Here is another one tutorial for ligthbox image gallery using bootstrap and jquery.
    http://www.kodingmadesimple.com/2015/05/twitter-bootstrap-responsive-image-gallery-tutorial-lightbox.html

    Reply
  5. Dan
    Posted on August 27, 2016 at 15:59 Permalink

    Hello,

    I will wish to retrieve the tag “alt” to each image to display below the variable “title”
    How do I adjust the JS code?

    Thank you very much for all answers and this lovely gallery
    Dan

    Reply
  6. peter
    Posted on August 3, 2015 at 11:23 Permalink

    Good and helpful tutorial there is another tutorial of how to create you own image gallery using jquery and css http://talkerscode.com/webtricks/basic-image-gallery-with-image-preview-using-jquery.php

    Reply
  7. Theo Jacobs
    Posted on July 18, 2015 at 00:24 Permalink

    Thanks for this, finally a gallery that (after a bit of finetuning) can be turned in the minimalistic gallery I’ve been after for quite a while.

    I’ve taken the liberty to adjust the index page to include some php code, so no adjustments have to be made to make a new gallery.
    The page has to be changed into a index.php page and these bits of code have to added:
    at the beginning:
    <?php $images=scandir('images'); array_shift($images);array_shift($images); ?>
    (the double array_shift is needed to delete the ‘.’ and ‘..’, that are the first two results of the scandir)
    right after the tag, this has to be added/changed:
    <?php $exif=exif_read_data('images/'.$images[0]); ?> <div id="bg"><a href="#" class="nextImageBtn" title="next"></a><a href="#" class="prevImageBtn" title="previous"></a><img src="images/<?php echo $images[0];?>" title="<?php echo $exif['Title'];?>" id="bgimg" /></div>
    A simple loop then reads the filenames and the titles (this presumes you add titles in the exif)
    <?php foreach ($images as $image) {$exif=exif_read_data('images/'.$image); echo '<div class="content">'; echo '<div><a href="images/'.$image.'"><img src="thumbs/'.$image.'" title="'.$exif['Title'].'"'; echo 'class="thumb" /></a></div></div>'; } ?>
    This presumes the thumbnails go in a folder ‘thumbs’, which I personally prefer, becuase they can have the same names then. But this of course can be adjusted to whatever one prefers.

    Reply
  8. Sam
    Posted on February 25, 2015 at 06:46 Permalink

    Hello thanks for the great script…

    HOW to go to a specific slide through text links?

    Reply
  9. David
    Posted on February 6, 2015 at 01:53 Permalink

    Would be cool if you could add something like –>

    if($keyboardNavigation==”on”){
    $(document).keydown(function(ev) {
    if(ev.keyCode == 38) { //up arrow

    MAXIMIZE

    }

    } else if(ev.keyCode == 40) { //down arrow

    RESTORE

    }
    });
    }

    Reply
  10. dython
    Posted on November 24, 2014 at 12:40 Permalink

    Hi,
    Thanks for sharing your great work.

    It seems like there is an issue that the last thumbnail doesn’t appear properly.
    I modified the code below, and it works fine now.

    var totalContent=$tsMargin;

    Thank you.

    Reply
  11. Bhavesh Hirani
    Posted on September 17, 2014 at 09:40 Permalink

    Hey Malihu,

    Firstly, I love this plugin. And its very important for the temple website I’m designing. But there’s some modification I need to do. I tried understanding the code and the css as well but no luck. I want to limit the div with class container to fit inside the screen. I have integrated another javascript file to allow user to swipe through the thumbnails. This script creates buttons so that desktop users can scroll through the thumbnails using these arrows(buttons). So the main problem is limiting the width of the div with class container to the screen width of the device.

    Thanks for the plugin and thanks in advance for your support.

    Reply
  12. Esther
    Posted on September 13, 2014 at 13:17 Permalink

    Hi, Awesome slider and thanks for sharing.
    Isn’t possible to add “play & pause button”? I’m use this to creating my photo gallery. Hope you can help.

    Reply
  13. mauricio
    Posted on May 29, 2014 at 00:18 Permalink

    GREAT CODE! , one question, it’s possible center thumbs, my gallery it’s only 3 photos, thks!!!

    Reply
  14. shaikhshabaz
    Posted on May 27, 2014 at 12:08 Permalink

    PLz guide me how to coneect this template contact form directly to the specified email address……

    Reply
  15. shaikhshabaz
    Posted on May 27, 2014 at 12:05 Permalink

    Hello ,plzzzz help me out .I had used yor Excellent Template for my client .but as if not I cannot able to connect Contact Form Directly to Email,Outlook is opening..Plz help me out..

    Reply
  16. Prasanth
    Posted on April 10, 2014 at 12:41 Permalink

    Thank You Very Mush keep going……………………

    Reply
  17. Mr. Hogarth
    Posted on March 12, 2014 at 11:32 Permalink

    This is an awesome blog post, this image slider looks just awesome that I created and put on my site.

    Reply
  18. miha
    Posted on February 19, 2014 at 00:29 Permalink

    It would be nice if you can have a link to every image in the gallery, because there is only a link to the gallery, but a link to single images would be nice.
    it would be also great it there was a possibility to have different gallery categories

    Reply
  19. Zorrek
    Posted on February 13, 2014 at 10:37 Permalink

    This is NOT fullscreen like I hoped! It’s merely full window. Dissapointing!

    Reply
  20. Zahid Hasan
    Posted on February 6, 2014 at 18:24 Permalink

    How do I hide the thumbnail completely? Remove it from the entire slider altogether?

    Reply
    • Zahid Hasan
      Posted on February 6, 2014 at 18:28 Permalink

      Also, is there anyway to enable Autoplay within the script?

      Reply
  21. Peter
    Posted on October 23, 2013 at 13:55 Permalink

    Is there any way to check if an image comes in vertical format and then bypass the image scaling block so such images will be displayed fully (not scaled)?

    Thanks for your reply!

    Reply
  22. darkfalco
    Posted on October 14, 2013 at 04:34 Permalink

    Hello Malihu, first of all, thanks.
    I mixed version 1 and version 2, but I’m having an issue with the “bgimg” display tag, when I load the website or click a thumbnail, the style gets to “display:none;”. Is there a way to fix this within the “gallery.js”?

    Thanks in advance.

    Reply
    • darkfalco
      Posted on October 15, 2013 at 01:27 Permalink

      I did a workaround just set the background style as !important on the CSS file…

      At the moment I’m having issues with:
      When an image is clicked it doesn’t fade in or fade out, just quick change.

      Where in the code can I check this, thanks.

      Reply
  23. Lem
    Posted on September 28, 2013 at 15:44 Permalink

    Hi
    Is there any way changing the size of the thumbnails??
    Thanks

    Reply
    • Thomek
      Posted on January 21, 2015 at 22:51 Permalink

      You can use Css for it.
      #outer_container .thumbScroller img {}

      Reply
  24. Khush
    Posted on September 20, 2013 at 17:08 Permalink

    Hi there, great work on this gallery. The only thing I find that would make this really perfect is the ability to sort the images. Right now I find that they are displayed based on file name and not based on the order in which they were added. Is it possible to make the images display in the order that that they were uploaded? ie the latest images show first and the older ones display later? Thanks in advance.

    Reply
  25. T
    Posted on August 21, 2013 at 02:35 Permalink

    I have tried to create a separate JS sheet for this great design – but i cannot separate the code from the html page and keep it functional. Wanted to use in multiple pages with one js sheet download for efficiency. Can the js code be done in a separate .js sheet? And yes I have deleted the in my attempts – nothing but js code on the page. In my attempts – the scroll bar appears but not the background image.

    Can anyone help?

    Thank You

    Reply
    • Jaime
      Posted on September 16, 2013 at 01:41 Permalink

      T:
      Put the call to the .js file at the end of the page, before the ending body tag

      Reply
      • T
        Posted on November 3, 2013 at 18:21 Permalink

        Tried it – could not get it to work – have you tried this? If yes, and it works let me know I will happily retry.
        on page script is the only way I could get it to function

        Thanks

        Reply
  26. Chris
    Posted on July 24, 2013 at 23:54 Permalink

    Thank you for your great work!

    I modified the code so I could have the large image link to a specific page based on a custom attribute added to the thumbnail image (attr = data-link).

    Here’s the updated JQuery code if someone is interested:
    http://pastebin.com/nyLTu07y

    The only things that would need to change in the HTML example is you would have to wrap the large image in the #bg div in an <a href="" class="parent-link"> tag and then add a data-link attribute with your URL to the thumbnail image like <img src="your-thumbnail.jpg" alt="alt" title="title" data-link="link-to-your-page.html">

    Reply
  27. Tomas
    Posted on July 17, 2013 at 00:34 Permalink

    Hi Malihu

    AWESOME Gallery!

    Is it possible to have more than one gallery on the same site… is there a good solution for this… ?

    Cheers, T

    Reply
  28. Hugo
    Posted on May 28, 2013 at 03:26 Permalink

    Is it posible to obtain the images path from a sql database?

    Reply
    • Hugo
      Posted on May 30, 2013 at 19:58 Permalink

      I already resolve how to get the path from my database and use it in the img, when I click on the next button change to the next picture, when I get to the last picture and click next it show me the first picture but when you click next again show the first again and again.

      Reply
      • Hugo
        Posted on May 30, 2013 at 20:14 Permalink

        I’m sorry but I forgot to include part of the code
        <div class="content"> <div><a href= <%= photo1 %> ><img src=<%=Session("Foto1")%> title="David Auto Sales" alt="" class="thumb" /></a></div> </div> <div class="content"> <div><a href= <%= photo2 %>><img src= <%= photo2 %> title="David Auto Sales" alt="" class="thumb" /></a></div> </div>

        Reply
  29. Daniel
    Posted on April 22, 2013 at 20:28 Permalink

    AMAZING THANK YOU

    Reply
  30. Without believes
    Posted on April 18, 2013 at 00:46 Permalink

    Hi,

    This is AMAZING thank you. I was just wondering, is there a way NOT to enlarge photos that are not big enough by default to fill the screen. Currently, smaller pictures just get enlarged (and so become blurry)

    thank you

    Reply
    • malihu
      Posted on April 18, 2013 at 00:48 Permalink

      You can set the $defaultViewMode to “normal” or “original” in the first line of the script.

      Reply
      • Without Believes
        Posted on May 2, 2013 at 07:59 Permalink

        Hi,

        thank you for the answer. I was more referring to a case, where we have 10 images in the gallery 8 are big enough to be fullscreen, but 2 are small (800×600).

        Reply

Comments pages: 1 4 5 6

Post a comment

Your e-mail is never published nor shared. Required fields are marked *

You may use these HTML tags and attributes:
<a href="" title=""> <abbr title=""> <acronym title=""> <b> <blockquote cite=""> <cite> <code> <del datetime=""> <em> <i> <q cite=""> <strike> <strong>
You can write or copy/paste code directly in your comment using the <code> tag:
<code>code here...</code>
You may also use the data-lang attribute to determine the code language like so:
<code data-lang-html>, <code data-lang-css>, <code data-lang-js> and <code data-lang-php>

css.php